Assistance in obtaining a visa and preparing documents
We can issue you an electronic visa to India in 1-3 days, so you will not need to fill out forms, collect documents and waste your time.
Phone (Telegram and WhatsApp) + e-mail
(More than 5 years of experience working with India). You can find out all the details here.
In connection with the change in the Consular fee and the constant jump in currencies, we have established a new price policy:
Registration cost: 2300 1500 + consular fee
You need:
- a scan or photo of the international passport (you can take their regular phone number - just so that everything is visible and all the inscriptions are clear),
- photo on a white background,
- scan or photo of a Russian passport.
Send your documents to us and in 1-3 days you will receive a completed visa. Constantly in touch, requests can be left around the clock.
What to pay attention to
In addition to the basic requirements listed above, it is important to take into account a number of other features:
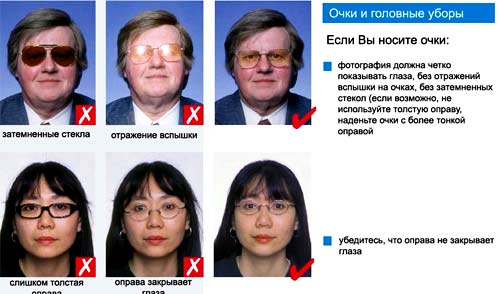
India visa photoThe face in the photo should be clearly visible. If you wear glasses, make sure that the frames are not too thick and that the lenses are not tinted or reflective;
- Do not wear a hat. Its presence is possible only for religious reasons and various medical prescriptions;
- The presence of strangers and objects in the frame is unacceptable;
- Do not use frames, corners, or curves in the photograph;
- The image must be printed on high-quality matte paper.
Types of visas
The first thing a future Indian visitor should know is that they have visa options. In 2021 you can get a visa:
- business;
- working;
- tourist;
- entry;
- transit.
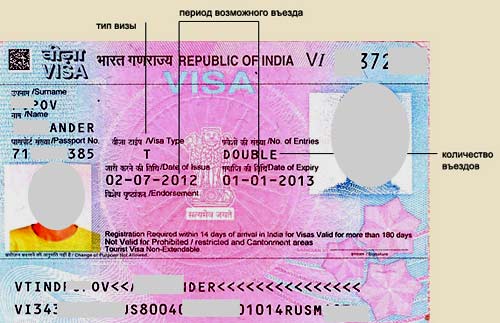
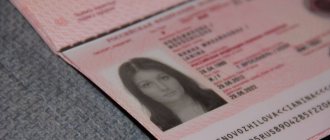
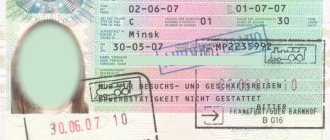
Example of a long-term regular visa with photo to visit India
Just as visas are different, so are the ways to obtain them. You can complete the document online at home. You can go to the Indian Embassy or Consulate. Your application will be accepted in Moscow, St. Petersburg and Vladivostok.
In fact, visas to India can be divided into two types:
- received online;
- received from a state body officially operating on the territory of Russia.
There is also the option of obtaining a visa on arrival in Goa. Judging by the reviews, this path is the most problematic and not relevant.
Answers to questions about applying for a visa to India
- Address of the Indian Embassy in Moscow
- How many days in advance should you apply for an Indian visa?
- How quickly can you get a re-entry visa to India?
- How to enter India with a double entry visa
- How to Apply for a Visa to India from Thailand
- How can a pensioner obtain a six-month visa to India?
- How to get a visa to India if there is no registration in your passport
- What documents are needed to travel to India with a child?
- Can a Russian citizen apply for a visa to India in Azerbaijan?
- Is it possible to travel around India with a Goa visa using the TVOA system?
- Is it possible to get a visa to Goa on arrival without a return ticket?
- Is it possible to get a tourist multiple visa to India?
- Is it possible to extend a visa to India?
- Is it possible to travel from North Goa to South Goa?
- Do you need a visa to travel to Goa?
- Is temporary registration required to obtain an Indian visa?
- Are there restrictions on issuing an Indian visa for a specific person?
Ask your question
Photo requirements for a regular visa
Those who plan to arrive in the country by plane, that is, the point of arrival will be the airport, can apply for entry documents to India through the website where the form is filled out. Those entering the territory of the Republic by another route are required to cross the state border with a completed document issued by the embassy or consulate.
Your visa must have a photo. The requirements for its quality and size remain the same in 2021. In this case, a high-quality photo taken professionally in a photo studio is pasted onto the printed application form.
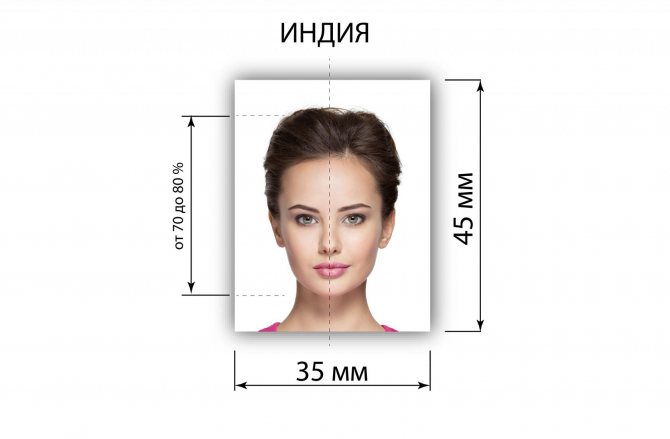
- The photograph must be in color.
- The face on it should occupy at least 70% of the area.
- Required size 35x45 mm.

This photo can be attached to the application form with your own hand or uploaded on the portal. In the latter option, if the photo does not meet the requirements, it simply will not load. You should know that when submitting documents for a visa to India, you must attach two photos of the size indicated above to each application form.
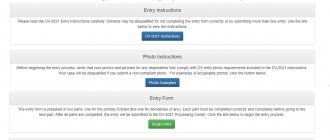
How to apply for a visa to India: instructions
To save money, travelers apply for the permit themselves. The instructions for obtaining a visa to India look like this:
- Determine the exact type of permission that is needed. Consider the purpose of the trip, the number of border crossings, and length of stay.
- Check the working hours of the Consulate or Visa Application Center in Moscow and make an appointment.
- Arrive on the specified day and time with a prepared package of documents.
- List the fee (we discussed how much a visa to India costs in a separate section). Pay the entire amount as required and attach the receipt to the overall package.
- Wait for the decision and receive a passport with a visa.
The above steps are enough to apply for an Indian visa on your own. The success of obtaining a permit largely depends on the correct collection and completion of documentation. It is necessary to take into account all the requirements of the Consulate in order to avoid refusal.
If the visa is issued online
When applying for a paper visa, the applicant has options and can either upload a photo online or paste it in, relying on the professionalism of the photographer. But those who apply for India e-Visa online must upload their photo image on the website.
To avoid the problem that some travelers to India have encountered, take the photo you upload seriously. It is required to comply 100% with ICAO requirements.
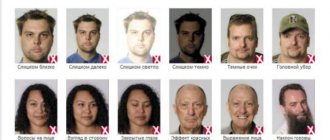
ICAO Photo Requirements
If you don’t want to have problems, choose a photo studio with experience and a large number of clients. Such workshops usually know how to take a high-quality photo that will not be rejected when uploaded to the Tourist Visa on Arrival website and similar resources where people upload photos for visa applications.
In reviews you can often find advice that it is advisable to complete online documents as early as possible. Deadline 4 days before travel. But this is only for those who spontaneously decided to go to India. It is better to start completing the application yourself in a few weeks or entrust this procedure to professionals who will quickly fill out the form and correctly upload a photo and a scan of the international passport in pdf format in the required size and resolution.
Applying for a visa through Visasam
With us, the visa application process will be easy and fast.
- Write to our specialist + 7 (WhatsApp/Telegram) and leave a visa application, you can also send an application by email [email protected]
- Our specialists will contact you shortly and discuss all the terms of cooperation.
- Within 24-72 hours of payment, you will receive your India e-Visa and begin your journey.
All you will need from you is a photo of your international passport, which you can take on your phone, and a photo of your face against a light background.
What should be the online photo for a visa to India?
In 2021, the photo requirements for an Indian visa are as follows:
- JPEG format;
- 10 – 300 Kb.
- The photo should be well lit, clear and contrasty.
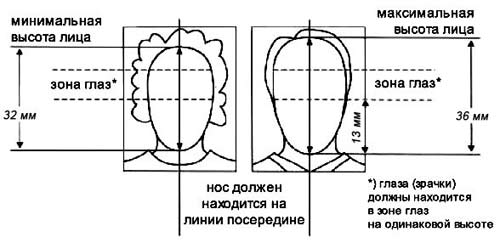
Retouching and any other visible processing is not allowed. The height of the face should be 25-30 mm. You should not grimace, do half turns and half bends. The eyes should be strictly on the same line. They don't need to be stared or squinted too much.
Your photo should look as natural as possible. Leave wide and welcoming smiles for the Indians with whom you will communicate upon arrival in India.
The employees who will process your paperwork may not like smiling from ear to ear. Only a slight half-smile is allowed. Never wear sunglasses. Hair should be removed from the eyes. The red eye effect will be a reason for refusal. No high hairstyles or facial hair. Only those whose religious beliefs do not allow them to part with a scarf and other spiritual accessories can be photographed wearing a headdress.
Requirements for photographs according to the ICAO standard
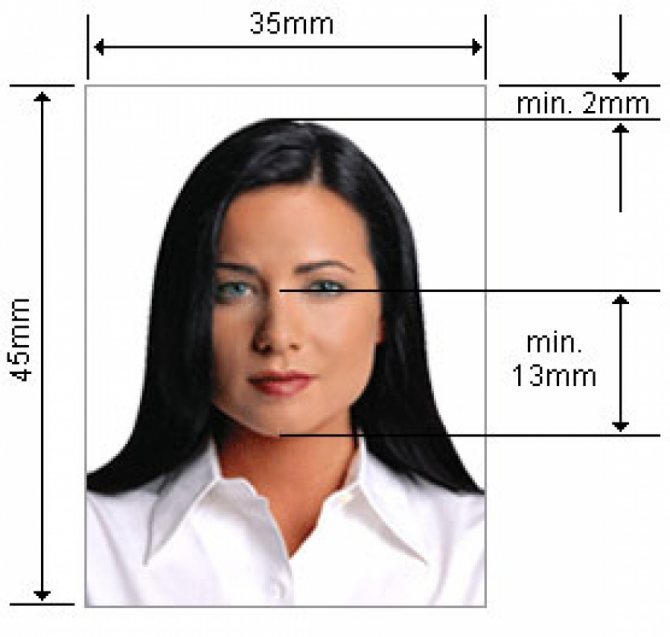
Dimensions: rectangular photograph - 35 by 45 millimeters, face height - from twenty-five to thirty-five millimeters, as a result it occupies about 70 - 80% of the picture.
Image quality: certainly high, correctly selected brightness, sharpness and contrast; when shooting digitally, use high resolution. No contamination or damage is allowed. The presence of light reflections, shadowed areas, red-eye effect, and distorted lighting is not acceptable.
Print quality: on special photo paper, with just such a high resolution. Color rendition: Calm colors; background – light, without transitions or patterns; without color distortion. Face: The image should cover from the top of the hair to the upper third of the chest, with the face clearly in the center of the photo, looking straight ahead. Tilt or turn of the head, or looking over the shoulder are not allowed. Photographs with closed or half-closed eyes, with hair or glasses blocking them are not acceptable. Glasses with dark lenses or blocking parts of the face that reflect the flash are not allowed. It is recommended to wear glasses with thin frames and anti-reflective lenses. The face should have a calm expression, the mouth should be closed.
The presence of headdresses is also not permissible, except for those worn for religious beliefs or medical reasons. If a headdress is present, it should not cover or obscure the face. The person being photographed must be alone in the photograph, without any foreign objects or other people; Based on all of the above, it is better to take photographs for obtaining a visa through a consulate or visa center in a salon/studio with a professional photographer.
Useful nuances
Rules for photographs for Indian visa
In fact, everything is very simple. The fact that many are faced with a problem is the result of a frivolous attitude towards paperwork and nothing more.
Even if you took a photo in the wrong format, the Indian Embassy will not interfere with you:
- Your photo can simply be cropped to the desired size.
- You may be charged an additional fee for correcting your profile after submitting a new photo.
- For India, consular fees for visas are quite a lot of money, and tourism brings good income, so you will get into the country in any case. You just might end up spending a little more time and money on getting a visa if you take the wrong photo.
Filling out an application for a visa to India
In 2021, entry into India has become significantly easier for citizens of many countries, because the electronic permit to visit India has proven itself well. The most difficult step in achieving your goal is filling out the visa application form.
Detailed online instructions for filling out an Indian visa application can be found here. It is important to remember that if you fill it out yourself, due to malfunctions of the Indian website and the long time it takes to fill out a 4-sheet application form in English, as well as problems with payment, you may not be able to receive a visa on time.
To obtain an electronic permit to enter the country in a short time, please contact us: WhatsApp +, e-mail
Basic restrictions on e-visa.
- purpose
– tourism, meeting with friends, relatives, treatment, business; - Entry airport
: Ahmedabad, Amritsar, Bengaluru, Chennai, Cochin, Delhi, Gaya, Goa, Hyderabad, Jaipur, Kolkata, Lucknow, Mumbai, Tiruchirapalli, Trivandrum & Varanasi; - number of entries
-
once or multiple times for 1 and 5 flight visas
; - upon entering the country, you must have a return ticket
or a ticket to another country; - , biometric data
(photo, fingerprints) will be taken from the tourist - travel around the country
only with an e-visa form; - presence of two blank pages in the passport.
Rules for entry into India
As you know, entry rules into different countries often change. To date, there is no information that the Indian authorities intend to change anything in relation to guests of the country entering it for various purposes. Depending on what type of visa you choose, the sample form for filling out the application form will be slightly different.
Most citizens who decide to visit the country choose the least troublesome route to obtaining visas and complete the documents online.
This makes it possible to significantly save time, avoid standing in queues and avoid traveling to another city if your place of residence is not Moscow, St. Petersburg or Vladivostok.
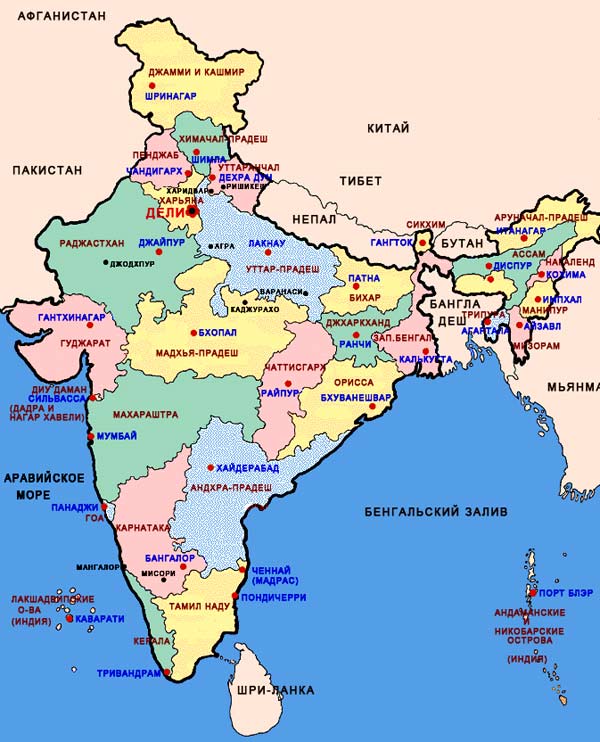
Detailed map of administrative divisions of India
Currently, the following Indian visas can be obtained:
- one-time;
- multiple,
- electronic multivisa for 1 year.
The first means that you have the right to enter the country only once for the permitted period. As soon as your stay in India ends, or you leave the country’s borders, you need to re-issue documents to return.
A multiple-entry visa gives you the right to travel an unlimited number of times within the period specified in the document. From August 2021, electronic permission can be obtained for 30, 365 days and 5 years.
It is worth keeping in mind that it is better to extend an Indian visa on the territory of another state. It is impossible to do this in India itself. It's better not to try. Experience shows that such attempts have led some to the local prison for violating the visa regime.
Filling out the form
The main difficulty in filling out the questionnaire is that the document was created in English. It is designed for citizens of various countries. Your task is to figure out what's what and correctly enter information about yourself. The first step that needs to be taken is to go to the website where the document for registration is located. Don't be confused by the wealth of information in English.
Sample of filling out the form page with personal data
If you have time, you can take a copy of the text to the translator and thoroughly understand everything. But the easiest way is to strictly follow the instructions. They are presented on many sites and analyze everything down to the smallest detail, explaining and deciphering every word.
The first thing you need to do when visiting the resource is to select the Regular Visa Application section, by entering which you will receive a ready-made form to fill out.
Follow the main rule: no Russian letters and Russian words. Remember, this questionnaire was created for everyone, not just for Russian-speaking citizens. You will have to write a lot of data. It is best to make sure that they are on hand in advance. Otherwise, filling out the form may take several days, as evidenced by reviews from Indian guests.
Step-by-step filling
The first thing that appears on the site when filling out online is a small sign where you should enter information. It is only a small part of an extensive text that will unfold before you step by step. After clicking on the Continue button, the Regular Visa Application section asks for general information about your visa, that is, the country from which you are applying and the location of the embassy or consulate.
If you indicate Russian Federation in the Country you are applying visa from column, the next column will give you three options to choose from:
- Moscow;
- Saint Petersburg;
- Vladivostok.
Next, you need to indicate which country you are a native of, selecting the desired country from a long list, and write your date of birth. You can use a calendar or write by hand. Then write your email address twice and indicate the approximate date of your arrival at the Indian airport. In the penultimate column you must select the desired type of visa. The choice determines which page the system will take you to. The finishing touch will be to enter the required code. If an error was made when filling out, the system will let you know and will not move you to the next window until you correct everything.
What to pay attention to when filling out
If you have a reasonable command of the English language, in addition to the fields that you must fill out, pay attention to the fact that on the right side of the page there are succinct explanations for each item. With their help, you can easily figure out what exactly you need to write.
The first page is a standard set of information about the applicant. First, the surname is written (just like in a foreign passport), then the first name. This is followed by an inscription and a window.
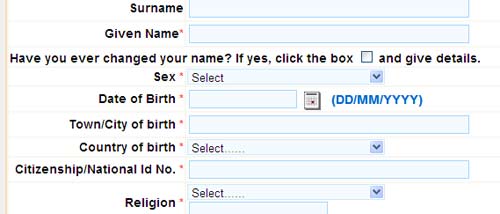
Filling out your last name and personal information
If you previously had a different last name, you should check the box and correctly enter your previous last name in Latin letters.
In total, you need to fill out three volume pages. This is not difficult if you use one of the samples provided here as a basis. We have selected the best options with which you can very quickly figure out what's what.
What data should be prepared for the first page
In order not to be delayed in filling out the first page, you need to prepare a foreign passport, as well as an internal passport, since you will have to enter the passport details of a Russian citizen. If you have a second passport, you also need to prepare it to enter data into the application form.
Judging by the reviews of tourists and other guests of India who visited the country, this section raised virtually no questions. The only thing required when filling it out is extreme care to write each letter correctly.
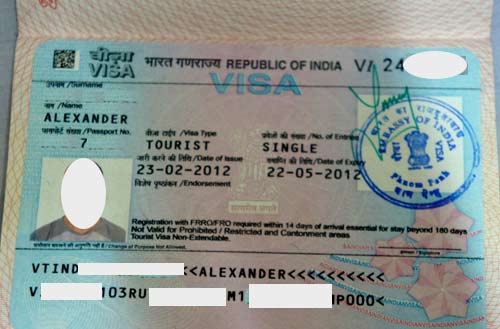
Sample tourist visa to India
Many fields are filled out by selecting from the proposed options. It is advisable to check everything again after filling. When a page is complete, you must click Continue To Next Page at the bottom to go to the next one.
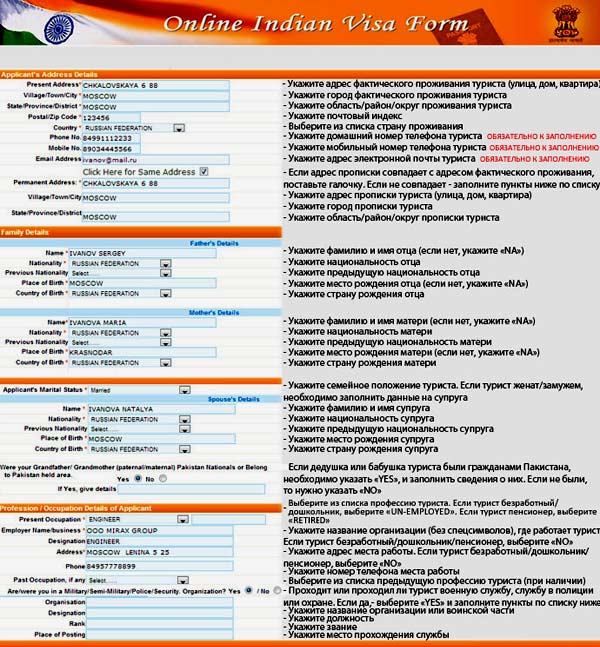
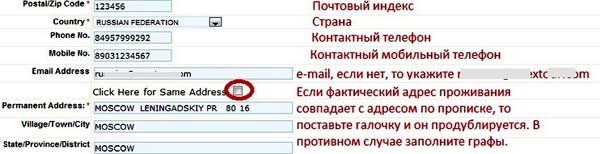
Information for the second page
The second page to fill out consists of several sections:
- actual residential address and registration;
- information about father and mother;
- marriage data (wife and children);
- information about work.
In this case, it is necessary to prepare to fill out the fields, since not only the names and surnames of close relatives are required, but also information about their nationalities, where they were born, etc. As for work, you will need to indicate the contact work phone number for those who served in the military service or service in law enforcement agencies, you will need to indicate your rank.
The third page is the final one
Be prepared to be puzzled by some of the questions. The third village is especially corrosive. Its purpose is to determine your previous relationship with India and your current goals for arriving in the country.
If you have been to India before, you will have to remember the name of the hotel where you stayed, the type of visa and where and when you received it.
On the page you need to indicate the countries you have visited in the last 10 years. You need to be prepared to answer questions about which airport you will fly into and which airport you plan to fly back from. Judging by the reviews, the third page took the most time, since even with a good sample, some questions turned out to be difficult to answer.
Some practical tips
If you are prepared to fill out the questionnaire, the process will take no more than 1.5 hours. It is not recommended to use the “Back” and “Update” buttons when filling out. This can lead to the loss of recorded data, which is very unfortunate, especially for those who do not speak English well. You will be encouraged by the fact that before you print out the form, you can review all its points again and make the necessary adjustments, if necessary. Some fields are optional. A sign that information needs to be entered is a red asterisk located behind the window.
Don't panic if you don't have the information you need at the moment. You will not have to fill out the form again; you can return to work at any time and continue what you started from where you left off. To do this, go to the page and enter the temporary number of your application and click Go. Most importantly, when logging out, do not forget to click Temporary Exit.
Whether you need to take out health insurance in India, you will find out from the following video.